
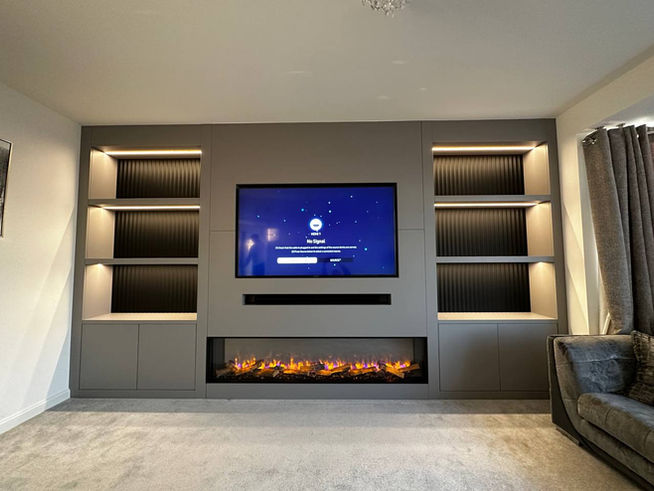
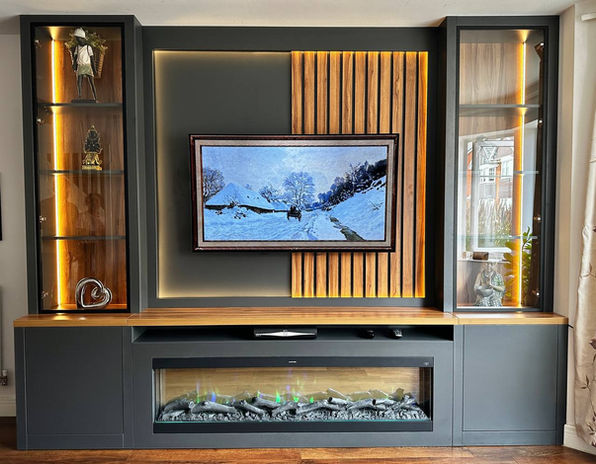
Hiding cables in a custom media wall can really enhance the look of your space. It begins with careful planning; map where your devices will go and consider adding extra power sockets for future needs. Using flexible conduits helps you manage cables easily, letting you add or change them later without drilling again. In-wall power kits can provide that clean finish by routing everything behind the wall, but might need professional help if you’re not handy with electrical work. If you’re going for surface solutions, paintable cord covers work well too. Custom shelving or decorative panels can also be attractive concealment options.
1. Plan Your Cable Layout for a Clean Media Wall
Before diving into your custom media wall project, take a moment to sketch a layout that includes all the devices you plan to use, such as the TV, soundbar, and gaming consoles. This step is crucial for visualizing where each cable will connect, ensuring a tidy appearance. Consider the height and viewing angle of your TV to determine the best placement for cables, allowing for a comfortable viewing experience.
It’s also important to identify the location of power outlets in your layout. Ideally, you want to place your devices close to these outlets to minimize the need for extension cords, which can create clutter. Make sure there are enough outlets available for all your devices and think about adding a few extras for future needs.
Using a stud finder will help you locate wood or metal studs in the wall where cables will run, providing additional support and stability. As you plan, create a list of all the cables required for each device, which helps streamline the installation process. Group cables by type, such as power, HDMI, and audio, to make organization easier.
When purchasing cables, consider their lengths to avoid excess that could create a messy look. Visualize how the cables will run behind the wall, ensuring there are no sharp bends or kinks that could damage them over time. Lastly, keep local building codes and safety regulations in mind as you finalize your cable layout, ensuring everything is up to standard.
- Before starting, sketch a layout for your media wall including all devices like TV, soundbar, and consoles.
- Consider the height and viewing angle of the TV to determine the optimal placement of cables.
- Identify where power outlets will be located to avoid extension cords if possible.
- Ensure there are enough outlets for all devices and consider adding extra for future use.
- Use a stud finder to locate wood or metal studs where cables will run for additional support.
- Create a list of all cables needed for each device to streamline installation.
- Group cables by type (power, HDMI, audio) to simplify organization.
- Plan for cable length when purchasing to avoid excess that could clutter the space.
- Visualize how cables will run, avoiding sharp bends or kinks that can damage them.
- Keep in mind local building codes and safety regulations when planning your layout.
 2. Utilize Flexible Conduit for Easy Cable Management
 2. Utilize Flexible Conduit for Easy Cable Management
Flexible conduit is a practical solution for managing cables in your custom media wall. Start by selecting the right size conduit, ensuring it can securely hold all your cables without overcrowding. This is particularly important in high-traffic areas, where cables can be susceptible to damage. To maintain access for future changes or upgrades, allow some slack in the conduit. You might also consider color-coded conduits; this makes it easier to identify different types of cables at a glance.
For a polished appearance, install the conduit along baseboards or walls to blend seamlessly with your decor. Use connectors and fittings at junction points for a neat finish, and secure the conduit to the walls with appropriate mounting hardware to prevent sagging. Remember to leave enough space within the conduit for air circulation, as this helps prevent overheating of the cables.
Labeling the ends of each conduit can save time when you need to troubleshoot or swap out devices. Depending on your layout, combining flexible and rigid conduit can provide a more customized solution for your cable management needs.
3. Install In-Wall Power Kits for a Sleek Finish
Installing in-wall power kits can greatly enhance the look of your custom media wall by eliminating visible cords. Start by choosing a reputable kit that meets local electrical codes to ensure safety. Carefully read the installation instructions, as improper installation can lead to hazards. When selecting locations for power outlets, choose spots that are easily accessible for plugging and unplugging devices, which adds convenience. It’s also wise to consider a power inlet that connects directly to a power source, keeping cords hidden. Make sure you have the right tools on hand, such as a drywall saw and a screwdriver, to make the job easier. Before installation, check that the power kits can handle the wattage of the devices you intend to use. To achieve a cohesive look, install wall plates that match your decor. If you feel uncertain at any step, consulting with a professional electrician can help ensure a proper and safe installation. Additionally, remember to use low-voltage cables for audio and video connections, as this minimizes interference with power cables. Finally, test all connections before closing up the walls to confirm that everything functions as intended.`
4. Use Cord Covers and Raceway Channels
Cord covers and raceway channels are practical solutions for hiding cables on the surface of your media wall. When selecting cord covers, look for options that are paintable or come in colors that match your walls. This ensures a discreet installation that blends seamlessly into your décor. Raceways can be mounted at various heights, allowing you to customize the look to suit your design. Make sure the channels are wide enough to accommodate all your cables without putting too much pressure on them, as this can cause wear over time.
Before installation, plan the layout of your cord covers to minimize visible seams or gaps. You can use adhesive tape or screws to securely mount these covers to your walls or baseboards. For a smoother appearance, install the covers in a straight line or follow the contours of your furniture. Be mindful of measuring your cables carefully to avoid cutting the covers too short. If your setup includes corners, consider using corner pieces to achieve a polished look around turns.
Labeling cords inside the covers can save time when you need to identify or troubleshoot connections. Lastly, regularly check that the cords remain secure and do not pull on any connections, ensuring everything stays tidy and functional.
5. Create Custom Shelving for Concealment
Building custom shelves can elevate your media wall while providing a practical solution for hiding cables. Start by designing shelves that not only hold your devices but also allow for discreet cable routing. Incorporate holes or channels within the shelf design to guide cords out of sight. To enhance the look, use decorative boxes or baskets on these shelves to conceal power strips and other less attractive items. Choose materials and finishes that complement the overall decor, ensuring a cohesive appearance.
Adjustable shelves are a smart choice, as they give you the flexibility to rearrange devices as needed without compromising cable management. Make sure the shelves are sturdy enough to support the weight of all your devices, and if you’re mounting them on drywall, use wall anchors for added stability. Remember to plan for ventilation around electronic devices to prevent overheating. Using cable ties or clips behind the shelves can help keep cables organized and prevent tangling. Finally, consider adding plants or artwork around the shelves to draw attention away from any visible cables, creating a more polished and inviting space.
6. Organize Visible Cables Effectively
To keep your media wall looking neat, organizing visible cables is essential. Start by using cable management boxes to conceal excess lengths of cables and power strips. This not only reduces clutter but also protects the cables from damage. You can also use zip ties or Velcro straps to bundle cables together, making everything look more orderly. For a more permanent solution, consider using clips or adhesive hooks to route cables along walls or furniture edges. This method keeps cables out of the way while maintaining a clean appearance.
Implementing a labeling system can be incredibly helpful too. Labels make it easier to identify which cable belongs to which device, simplifying any troubleshooting or equipment changes down the line. If you’re looking for a streamlined look, investing in cable sleeves can group multiple cables together, creating a cohesive appearance.
Positioning furniture strategically can also help hide cables. For instance, placing your entertainment unit in front of cable runs can effectively obscure them. Additionally, think about using decorative elements like fabric or wallpaper to creatively disguise visible cables, adding both style and function.
Regular maintenance is key, so check your cable organization periodically, especially as you add new devices. Ensure that all visible cables are secured to avoid tripping hazards. By following these tips, you can achieve a clean, organized media wall that enhances your space.
7. Consider Wireless Devices to Reduce Clutter
Evaluating your devices can help you identify which ones can be switched to wireless options, like sound systems or streaming devices. By using Bluetooth or Wi-Fi-enabled products, you can eliminate many audio and video cables that clutter your media wall. Before making any changes, check the compatibility of these wireless devices with your existing system to ensure everything works smoothly. Additionally, a strong internet connection is crucial for the optimal performance of wireless devices, so make sure your network can handle the load. Where possible, consider battery-operated devices to further cut down on cables, and think about incorporating wireless charging stations for compatible gadgets. Implementing smart home technology can also simplify control and reduce cable clutter. Instead of relying on physical remotes, utilize apps or remote controls to manage your devices wirelessly. Keeping the firmware of your devices updated is important for smooth operation and security. Lastly, regularly assess whether your wireless devices meet performance expectations to avoid potential frustration.
8. Shorten Cables to Improve Appearance
Shortening cables can significantly enhance the overall look of your media wall. Start by carefully measuring the distance between your devices to select the right cable lengths. If you’re not confident in cutting and terminating cables yourself, it might be wise to hire a professional. They can ensure everything is done correctly and safely. Additionally, consider using cable management solutions that allow for easy length adjustments. This way, you can avoid the clutter that comes with coiling excess cable, which can also lead to damage. Purchasing shorter cables reduces slack and keeps your setup looking neat. To keep organized, use cable wraps or sleeves to protect these shorter cables. If your setup is unique, explore options for custom-length cables from manufacturers. Velcro straps can be handy for bundling shorter cables neatly together. As a precaution, maintain a backup of any longer cables you remove, just in case you need them later. Lastly, remember to regularly assess your setup as devices change, ensuring that you keep everything tidy and efficient.
9. Hire Professionals for Safe Installation
If you’re feeling unsure about tackling the installation of your media wall on your own, hiring professionals can be a smart choice. Start by researching local professionals who have good reviews and a solid track record in media wall installations. It’s wise to request quotes from multiple service providers so you can compare prices and find a fair deal for the work you need. Make sure to check their certifications and licenses to ensure they meet safety standards and comply with local regulations.
Before the installation begins, it’s important to discuss your layout and goals with the professional. This helps ensure they grasp your vision for the media wall. Additionally, ask if they provide a warranty or guarantee on their work, which can offer you peace of mind. Don’t hesitate to request references or examples of their previous work to assess the quality of their craftsmanship.
Be clear about your budget and timeline to avoid any misunderstandings later on. Establishing a communication plan will keep you updated throughout the project, making the process smoother. Lastly, inquire about their cleanup process after the installation is complete, and consider scheduling a follow-up visit for any adjustments needed after the initial work.
Frequently Asked Questions
What are some easy ways to hide cables in my media wall?
You can use cable raceways, cord covers, or even run cables behind the wall for a cleaner look.
Can I hide cords if I have a mounted TV?
Yes, you can conceal cords by using wall plates with openings for cables or by hiding them inside the wall.
Will hiding cables affect my devices’ performance?
No, as long as the cables are installed properly, hiding them shouldn’t impact performance.
Is it safe to hide cables behind the wall?
Yes, it’s safe as long as you follow local building codes and ensure no damage to electrical systems.
What tools do I need to hide my cables in a media wall?
You’ll typically need a drill, stud finder, screwdriver, and possibly some adhesive for securing cable covers.
TL;DR To hide cables in a custom media wall, start with a clear cable layout, utilizing flexible conduit for easy management. Consider in-wall power kits for a streamlined look and use cord covers or raceway channels to conceal surface cables. Custom shelving can help hide cables, while organizing visible ones with management boxes and labels enhances the setup. Opt for wireless devices to minimize clutter, and shorten cables for a cleaner appearance. If needed, hire professionals for safe, compliant installation.