
Choosing materials for a custom media wall can be an exciting adventure! First, grasp the concept of what a media wall truly is, a multifunctional centerpiece blending entertainment, storage, and aesthetic appeal. Start with sturdy materials like FSC-certified timber for structural integrity and consider board options like MDF for smooth finishes or plywood for extra strength. Design plays a crucial role too, stay mindful of layout, functionality, and style to create seamless coherence in your space. Don’t forget about electrical management and lighting; ambient features enhance beauty while maintaining practicality. With thoughtful planning, your media wall can become an inviting focal point in any room.
1. Selecting Strong Materials for Durability
When creating a custom media wall, selecting the right materials is essential for ensuring durability and longevity. Start by choosing moisture-resistant materials, particularly if your media wall will be in a humid environment like a basement. This can prevent damage and warping over time. For the shelving and structural components, heavy-duty options are crucial, they need to support large TVs and audio systems without sagging or bending.
Opt for finishes that resist scratches and wear, especially if the area experiences high traffic. Laminated surfaces and glass not only look sleek but are also easy to clean, making maintenance a breeze. To enhance the overall strength of your media wall, consider reinforced joints and brackets; these provide added stability and can carry the weight of your electronics securely.
Safety is also a top priority. Using fire-rated materials near heat sources or electrical components is essential to minimize risks. As you plan, evaluate the weight of your electronics to choose appropriate wall anchors and supports, ensuring everything is securely mounted.
If you’re environmentally conscious, look into eco-friendly materials that are both durable and stylish. Always consult with builders or design professionals about the best materials tailored to your specific design needs. Finally, make sure to source materials from reputable suppliers to guarantee quality and longevity, ensuring your media wall remains a stunning focal point for years to come.
2. Types of Boards for Media Walls
When it comes to crafting the perfect media wall, the choice of boards plays a pivotal role in both functionality and aesthetics. MDF, or medium-density fiberboard, is a favorite among designers for its smooth surface, making it a breeze to paint or apply veneers. This allows for a polished look that can match any decor style. On the other hand, plywood stands out for its strength and versatility, making it an excellent choice for structural support and custom cabinetry. Its durability means it can handle heavier items without sagging.
If you’re looking for something more budget-friendly, particleboard can be a viable option, especially in hidden areas where durability isn’t as critical. Just keep in mind that it may not hold up as well in high-traffic spots. For those seeking a sleek, modern finish, melamine boards are ideal; they come pre-finished, eliminating the need for painting while providing a clean look.
In spaces like kitchens and bathrooms, moisture-resistant boards are a must to withstand humidity. If sound quality is a concern, consider using soundproof boards or acoustic panels to minimize noise transmission and enhance audio experiences. For a unique twist, backlit boards can create a stunning visual effect, adding warmth and ambiance to your media wall.
Lastly, think about combination boards that blend materials like MDF and plywood to optimize both cost and performance. Remember to factor in the weight of the boards during your planning to ensure your media wall has the proper support to stand the test of time.
3. Key Design Factors to Consider
When designing your custom media wall, there are several key factors to keep in mind to ensure it not only looks great but also functions well. First, consider the height of the media wall. Position your screen at eye level for the best viewing angles from various seating areas, making your movie nights or gaming sessions enjoyable for everyone. Next, think about the color scheme. Selecting hues that complement your room’s existing palette can create a cohesive look that ties the space together beautifully.
Modular designs are also worth considering, as they allow for future updates or technology changes. As devices evolve, you want a setup that can adapt without needing a complete overhaul. Incorporating hidden compartments for gaming consoles or streaming devices helps maintain a clean, uncluttered appearance, while ensuring easy access to media components like DVD players or game systems is essential for convenience.
Symmetry can provide a balanced aesthetic, while an asymmetrical layout can bring a modern twist to your design. Don’t forget to add visual interest through textures, such as a combination of wood and metal finishes, which can elevate the overall appeal of the media wall. Choosing the right lighting is crucial too; it can highlight specific features of your media wall while minimizing glare on screens, enhancing the viewing experience.
Lastly, think about airflow around electronic devices to prevent overheating, and make room for personal touches like family photos or memorabilia to truly make the space your own.
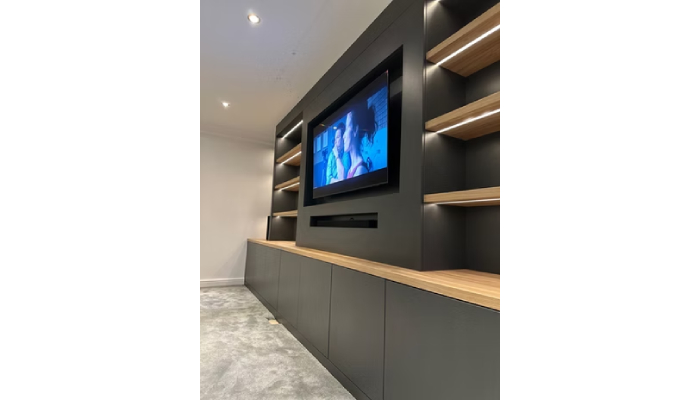
4. Effective Storage Solutions
When designing a custom media wall, effective storage solutions are key to blending functionality with style. Start by incorporating a mix of open and closed storage: closed cabinets can keep the clutter out of sight, while open shelves allow you to display cherished items or decorative pieces. Pull-out drawers are fantastic for easy access to items stored inside cabinets, making it simple to grab what you need without digging through everything.
Consider adding built-in cubbies specifically for housing media devices, remotes, or even books, ensuring everything has its place. Adjustable shelving is another smart choice, as it can accommodate various sized items and adapt as your needs change over time. Decorative baskets or bins on shelves not only provide a tidy look but also add a touch of charm.
Ensure dedicated spaces for gaming consoles, making sure they have proper ventilation to avoid overheating. Wall-mounted shelves are a brilliant way to save floor space while showcasing decorative items that reflect your personality. Hidden compartments can work wonders to keep your space organized and clutter-free, making your media wall feel open and inviting.
Designing storage areas with easy cable access is crucial to minimizing visible wires, contributing to a cleaner look. Lastly, don’t overlook vertical storage solutions; utilizing wall space efficiently can transform your media wall into a highly functional and visually appealing centerpiece.
- Incorporate a mix of open and closed storage to balance aesthetics and functionality.
- Use pull-out drawers for easy access to items stored inside cabinets.
- Consider built-in cubbies for housing media devices, remotes, or books.
- Adjustable shelving can accommodate different sized items and allow for customization.
- Use decorative baskets or bins on shelves for a tidy look while providing storage.
- Create dedicated spaces for gaming consoles, ensuring they have proper ventilation.
- Use wall-mounted shelves to save floor space while showcasing decorative items.
- Incorporate hidden compartments to keep clutter out of sight, making the area feel organized.
- Design storage areas with easy cable access to minimize visible wires.
- Finally, consider vertical storage solutions to utilize wall space efficiently.
5. Managing Electrical and Cable Needs
When designing a custom media wall, managing electrical and cable needs is crucial for both functionality and aesthetics. Start by planning for adequate power outlets to support all your devices, ensuring you don’t overload any circuits. Using power strips with surge protection can safeguard your electronics from unexpected power surges, keeping them safe and sound. For more complex wiring and connections, consider hiring a professional to handle the installation, ensuring everything is done safely and correctly.
Effective cable management systems can be a game changer, helping you hide and organize cords so they don’t clutter your beautiful setup. Installing outlets in hidden compartments can maintain a clean look, which is especially important in a space designed for relaxation and entertainment. As technology continues to evolve, it’s wise to plan for future upgrades by including extra outlets in your design. This foresight will save you from potential headaches down the line.
Make sure all electrical work meets local building codes and safety regulations to prevent any issues. If you’re looking to reduce cable clutter, consider using wireless devices where possible. Labeling your cables is another smart move; it allows you to easily identify connections during setup or troubleshooting, making your media wall even more user-friendly. Lastly, remember to allow for ventilation around electronic devices to prevent overheating, keeping everything running smoothly.
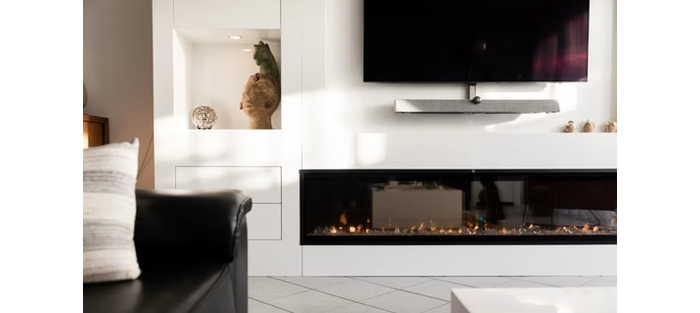
6. Creative Lighting Ideas
Lighting can transform your custom media wall into a stunning focal point. Incorporating LED strip lighting along shelves creates a modern, glowing effect that adds depth and excitement. Adjustable recessed lighting is perfect for highlighting key design features, making your media wall truly stand out. Consider adding dimmable options to control the ambiance, whether you’re watching a movie or hosting a gathering. Smart lighting systems allow you to control the lights via mobile apps or voice commands, adding convenience to your entertainment experience. Don’t forget about colored LED lights, which can set the mood for movie nights or parties. Wall sconces provide stylish illumination at different heights, enhancing both functionality and design. Backlighting your TV can reduce eye strain and create a cozy atmosphere. Use focused spotlights to draw attention to artwork or decorative items, adding visual interest. Task lighting is also essential in areas designated for reading or gaming, ensuring every activity is well-lit. Ultimately, make sure that all lighting choices complement the overall design and color scheme of your room, creating a cohesive and inviting space.
7. Sound System Integration Tips
When designing a custom media wall, sound system integration plays a vital role in creating an immersive audio experience. Opt for sound systems that can be discreetly integrated into the media wall design, allowing you to maintain a clean and modern look. In-wall speakers are an excellent choice, as they save space and provide high-quality sound without bulky equipment. If you prefer a simpler solution, soundbars offer powerful audio output with easy installation, making them a popular option for many homeowners.
To further enhance your media wall’s sound quality, consider incorporating acoustic panels into the design. These panels help minimize noise reflections and improve overall audio clarity. It’s also essential to plan speaker placement carefully, considering your room’s layout for the best surround sound experience. Hiding wiring for sound systems is crucial for maintaining aesthetics, so plan cable management solutions that keep everything neat and organized.
For a clutter-free environment, explore wireless audio options that eliminate the need for numerous cables. During installation, don’t forget to test sound quality to ensure that every component performs optimally. Additionally, furniture arrangements can significantly affect sound distribution, so position seating areas thoughtfully to enhance the audio experience for everyone.
Finally, consulting audio professionals for advice can be invaluable. They can help you achieve the best sound experience tailored to your specific needs, ensuring that your media wall not only looks great but sounds fantastic too.
8. Understanding Cost Factors
When planning your custom media wall, understanding the cost factors is essential. The overall cost is influenced by the choice of materials, size, and complexity of the design. Basic media walls typically start around $1,800, while high-end custom builds can easily exceed $6,000. Labor costs can vary significantly based on local rates and how intricate the installation is. Don’t forget to consider the cost of electronics, as they often make up a large portion of your budget. Additionally, plan for extra costs like lighting, sound systems, and custom cabinetry, which can elevate both functionality and aesthetics. Investing in quality materials can save you money on repairs over time, making it a smart choice. It’s wise to shop around to compare prices from different suppliers before making purchases. Also, keep an eye out for potential hidden costs, such as electrical upgrades or permits if needed. If you’re looking to cut down on expenses, consider DIY options for parts of the project to reduce labor costs. Finally, create a budget that includes a buffer for unexpected expenses to ensure you’re prepared for any surprises along the way.