
Maximizing storage on media walls with shelves can transform your space into an organized haven. Start by sketching layouts to visualize placements for TVs, consoles, and shelving. Determine what needs displaying versus hiding to shape your design effectively. Incorporate built-in cabinets that recess into the wall while using deep ones for larger items. Floating shelves can showcase décor or books, ideally limited to three per side for cleanliness. Mix open and closed storage; this balances aesthetics and functionality while protecting devices from dust. Lastly, make sure cable management is considered, avoiding clutter but ensuring tech remains easily accessible in your stylish setup.
1. Planning Your Media Wall Layout
To start off your media walls with shelves project, accurate measurements are key. Take the time to measure your space carefully; this will help you decide the best layout for your media wall. Next, think about the focal point of your room. Positioning your media wall so it draws the eye can enhance the overall aesthetic. Don’t forget about the flow of the room, consider how people will move around the space to ensure it remains functional and inviting. Incorporate a mix of horizontal and vertical lines in your design to create visual interest.
As technology keeps evolving, it’s wise to plan your layout with future upgrades in mind. Leave room for additional devices, so your media wall can adapt over time. Before diving into construction, use design software or apps to visualize your media wall. This can help you see how everything fits together and make adjustments as needed.
Aim for a comfortable viewing height for your TV and other devices. Too high or too low can strain your neck and diminish your viewing experience. Additionally, think about the lighting, adequate lighting enhances both the appeal and functionality of your media wall.
When it comes to shelves, consider their height carefully. You want them to be accessible and practical for your everyday needs. Finally, ensure that the design of your media wall aligns with the overall theme of your room for a cohesive and polished look.
2. Choosing the Right Shelving Types
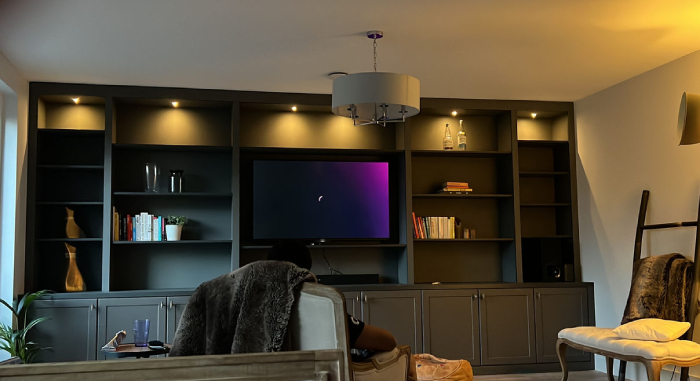
Selecting the right shelving types is crucial when maximizing storage on your media wall. Start by picking materials that either match or complement your existing furniture, ensuring a cohesive look throughout the space. Adjustable shelves are a fantastic option, offering versatility as your storage needs evolve over time. If you’re after a modern aesthetic, clear acrylic shelves provide an unobtrusive way to display your favorite items without overwhelming the room. Don’t ignore the corners; incorporating corner shelves allows you to utilize every inch of available space effectively. Floating shelves are perfect for a minimalist vibe, giving your media wall an open and airy feel while showcasing decorative pieces. For a more streamlined appearance, closed cabinetry with doors can hide clutter, keeping your space neat and organized. Open shelving is great for displaying books, art, or decorative items that add personality to your wall. It’s essential to ensure that all shelves are sturdy enough to support the weight of your media equipment and decor. Built-in shelves offer a seamless and integrated look, making them a stylish choice. Lastly, consider multi-functional shelving units that can serve as room dividers or additional surfaces, maximizing both storage and utility.
3. Aesthetic Choices for Your Media Wall
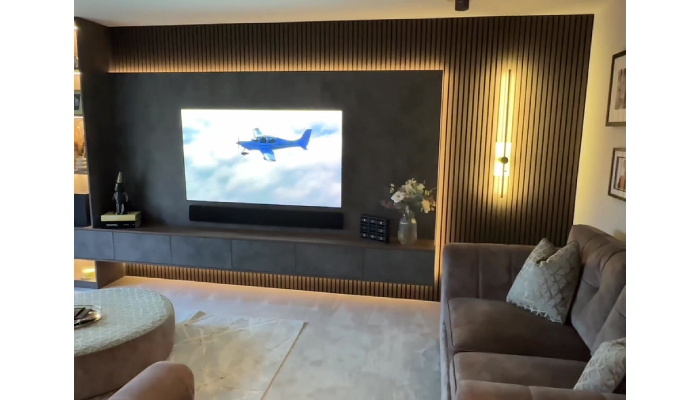
When designing your media wall, the aesthetic choices you make can transform not just the wall itself but the entire room. Start with a color palette that complements your existing décor, creating a sense of harmony. Think soft neutrals for a calming effect or bold hues for a striking statement. Incorporating different textures, like warm wood or sleek metal, adds depth and interest, inviting viewers to explore your space.
To ensure your media wall aligns with your home’s style, consider whether your vibe is modern, rustic, or traditional. A modern setup might include sleek lines and geometric shelving, while a rustic theme could feature reclaimed wood and vintage decor. Personal touches, like artwork or framed photos, can make the media wall feel uniquely yours.
Accent lighting is another fabulous way to highlight key features of your media wall. A well-placed LED strip or spotlights can draw attention to your favorite decor pieces, creating a cozy atmosphere. Mixing materials, such as glass shelves paired with wooden cabinets, introduces a contemporary feel that is both chic and functional.
Don’t shy away from experimenting with shapes in your shelving design. Geometric patterns can add a modern twist, making the space visually engaging. You might also want to select a statement piece, like a large painting or sculpture, that anchors the design and serves as a focal point.
Lastly, consider incorporating plants for a touch of nature and color that breathes life into your media wall. Greenery not only enhances the visual appeal but also brings a refreshing atmosphere into your home. If you’re feeling adventurous, wallpaper or decals behind the media wall can provide added visual impact, making the entire setup pop.
4. Enhancing Functionality and Accessibility
To truly get the most out of your media wall, you need to prioritize functionality and accessibility. For example, keep frequently used items within easy reach by avoiding high shelves, making it simple to grab what you need without a ladder. Design open spaces specifically for easy access to your devices and media collections, allowing you to enjoy your entertainment setup without hassle. Pull-out shelves can be a game changer, helping you retrieve items from deep cabinets without the need to dig around blindly.
Don’t overlook the importance of ventilation around electronic devices to avoid overheating, which can lead to performance issues. Also, consider the placement of power outlets; having them in convenient locations will make it easier to plug in devices without the mess of long cords.
Use drawer dividers to keep smaller items organized and at your fingertips, so remotes, batteries, and chargers are always easy to find. Labeling storage boxes or bins can save time as well, allowing quick identification of contents without unnecessary searching.
Think about incorporating a small workstation or charging station within your media wall for added convenience, and make sure remote controls and accessories have designated storage spots to avoid the common clutter. Finally, design your media wall with easy cleaning and maintenance in mind, ensuring that dust doesn’t accumulate around your electronics and that you can keep your space looking sharp.
- Ensure that frequently used items are easily reachable, avoiding high shelves.
- Design open spaces for easy access to devices and media collections.
- Incorporate pull-out shelves for easy retrieval of items from deep cabinets.
- Plan for adequate ventilation around electronic devices to prevent overheating.
- Consider the placement of power outlets for easy access to plug in devices.
- Use drawer dividers to keep small items organized and accessible.
- Incorporate labels on storage boxes or bins for quick identification of contents.
- Add a small workstation or charging station within the media wall for convenience.
- Ensure that remote controls and accessories have designated storage spots.
- Design the media wall to facilitate easy cleaning and maintenance.
5. Using Vertical Space Effectively
To truly maximize storage on media walls, harnessing vertical space is key. By drawing the eye upward, you can create the illusion of a larger room. Consider incorporating tall bookcases or shelving units that reach the ceiling, which not only looks dramatic but also provides ample storage. For larger shelves, using vertical dividers can help you organize items, making everything easy to find. Ladder-style shelves are another fantastic option, adding height without overwhelming the space.
Don’t overlook the area above your shelves; installing hooks or a pegboard can give you additional storage for items like headphones or gaming controllers, keeping them within reach yet out of the way. Your media wall can also be enhanced with decorative elements above the TV, turning that often overlooked space into a stylish feature. For tight areas, narrow cabinets can serve as vertical storage solutions, while wall-mounted options can keep your devices organized and neat.
To enhance the vertical appeal, consider adding wall art or decals above your shelves, creating visual interest without cluttering the space. Just remember, safety is paramount. Make sure all vertical elements are securely anchored to the wall to prevent any accidents.
6. Balancing Open and Closed Storage
Finding the right balance between open and closed storage can transform your media wall into a stylish and functional centerpiece. First, consider what items you want to showcase versus those that should be tucked away. Open shelving is perfect for decorative pieces, books, or cherished collectibles that add personality to your space, while closed cabinets are ideal for electronics and anything that might contribute to clutter. To protect your treasures from dust while still displaying them, glass-front cabinets can be a game changer.
Incorporating stylish storage boxes or woven baskets on open shelves not only keeps things organized but also enhances the overall aesthetic. Mixing shelf heights adds visual intrigue, allowing for a dynamic look that draws the eye. Accessibility is key, so ensure that items in closed storage are easy to reach, possibly by using sliding doors that save space and provide quick access.
For a truly captivating design, think about shelves with built-in lighting to highlight your open storage areas. This small touch can dramatically elevate the look of your media wall, making it not just a storage solution but a statement piece in your room. Finally, remember that closed storage can cleverly hide less attractive items while keeping them handy. Always curate your open shelves to avoid clutter, creating a balanced and inviting environment.
7. Future-Proofing Your Media Wall Design
When designing your media wall, think about the future. Flexibility is key, so choose modular shelving systems that you can easily reconfigure as your needs change. This way, if you get a new gaming console or upgrade your sound system, your storage can adapt without needing a complete overhaul. It’s also wise to incorporate universal power outlets, which can accommodate future gadgets that may not even be on the market yet. Planning for additional storage space ensures you can easily add new items without cluttering your space.
Selecting durable materials is another important aspect of future-proofing; timeless designs in wood or metal can avoid the need for replacement down the line. Consider adding hidden compartments for tech accessories, keeping the aesthetic clean and organized. Moreover, reserve some shelf space for future trends, like smart home devices or the latest gaming consoles, to stay ahead of the curve. Lastly, design with scalability in mind, allowing your media wall to grow along with your collection. Regularly assess and update your media wall as technology evolves and your style preferences shift, ensuring it always meets your needs.