
When considering a media wall with shelves, it’s essential to blend functionality with style. These installations can elevate your living room by providing storage solutions, hiding clutter, and serving as a focal point. Before diving into your project, check the wall’s strength and ensure there’s enough space for your design. Think about wiring to keep things tidy and avoid visible cables. Additionally, balance aesthetics with practicality by selecting durable materials that fit your decor, while including both open shelves for display and closed cabinets for storage. Lastly, consider lighting to highlight features, adding warmth to the entire setup!
1. Purpose and Benefits of Media Walls
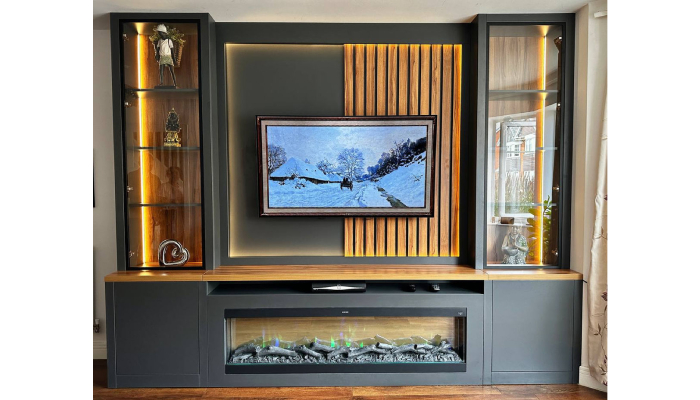
Media walls with shelves are more than just a place to mount your TV; they create a unified look that draws attention and keeps your space tidy. Imagine having all your media devices housed in one stylish unit, transforming your living room into a one-stop entertainment hub. Customizable designs allow you to reflect your personal style, enhancing the character of your space. Not only do these walls accommodate current tech, but they can also be designed to adapt to future innovations, ensuring your setup remains relevant and functional for years to come.
Additionally, media walls can serve dual purposes, acting as both storage and display areas, maximizing utility in even the smallest rooms. This feature can be particularly appealing to potential buyers, as a well-designed media wall can increase your property’s value by showcasing modern features that many look for.
Cost-effective solutions are available, meaning you can create a stunning media wall without breaking the bank. Plus, they can improve acoustics in your room, enhancing sound quality for an immersive experience. Don’t forget about lighting; incorporating features that enhance ambiance can elevate your viewing experience. Finally, custom shelving can showcase your favorite decor items, adding visual interest and personality to your space.
2. Key Considerations for Installation
Choosing the right wall is crucial, as it needs to support the weight of your TV, shelves, and other components. Look for a spot that fits well within the room’s layout. Make sure the wall is not only sturdy but compliant with local building codes and regulations, which can save you from future headaches. When it comes to the height of the TV, aim for eye level when seated; this ensures a comfortable viewing experience. Keep in mind ventilation, especially if your media wall is enclosed, to prevent overheating of your devices. It’s also wise to think about accessibility for future maintenance, so you won’t struggle to reach wires or components later on. The media wall should complement your seating arrangement, enhancing the flow of the space. Consider the wall’s finish and texture as this can significantly affect the overall aesthetic. Proper lighting is essential too. Think about how you can enhance functionality and style with accent lighting or task lighting. Lastly, be aware of any obstructions like windows or doors that could affect your installation. Consulting with a designer or contractor before starting can help refine your plans and ensure a smooth installation process.
- Select a wall that can support the weight of all components, considering the overall layout of the room.
- Check local building codes and regulations to ensure compliance during installation.
- Consider the height of the TV for optimal viewing angles, typically eye level when seated.
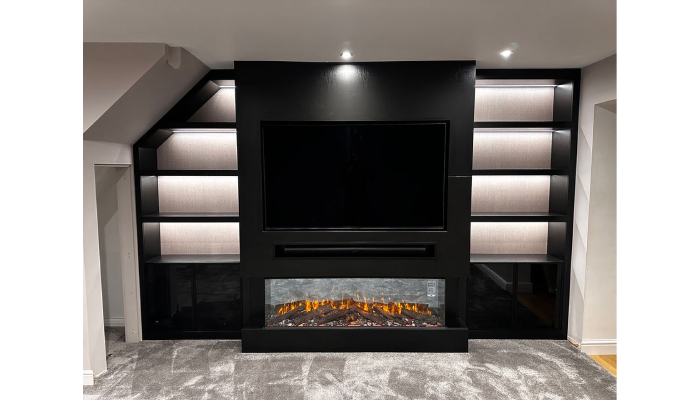
- Plan for ventilation to prevent overheating of electronic devices, especially in enclosed spaces.
- Think about accessibility for future maintenance or upgrades to electronics.
- Evaluate the floor plan to ensure the media wall complements the seating arrangement.
- Consider the wall finish and texture, which can impact the overall look of the media wall.
- Ensure proper lighting is available or planned for the media wall, enhancing functionality.
- Be aware of any potential obstructions such as windows or doors when choosing the location.
- Consult with a designer or contractor to review plans before proceeding with installation.
3. Essential Design Tips for Media Walls
Creating a stunning media wall requires thoughtful attention to design elements. Start by mixing textures like wood and metal to add depth and visual interest. This contrast can make your media wall feel dynamic and inviting. Next, choose a color scheme that complements the rest of the room, ensuring your media wall blends seamlessly with your existing decor. Adjustable shelves are a fantastic addition, offering flexibility to display various items and adapt as your collection grows.
Incorporate hidden compartments to store remotes and other small items, keeping your space tidy and organized. Consider adding a focal point, such as a striking piece of art or a cherished item that draws the eye and serves as a conversation starter. Symmetrical designs can enhance balance, creating a polished look that elevates the overall aesthetic of your room.
When arranging decorative items, vary their heights to create dimension and intrigue. Smart storage solutions, like pull-out shelves or cabinets, can provide easy access to your electronics while maintaining a clean appearance. Experimenting with different lighting options, such as LED strips, can further highlight your shelves and features, adding an inviting glow to your media wall. Finally, make sure your design allows for easy access to wiring and electronics, ensuring you can keep up with future tech upgrades.
4. Lighting Ideas for an Attractive Media Wall
Lighting can make or break your media wall, turning it from ordinary to extraordinary. Start with ambient lighting to create a cozy atmosphere that invites relaxation. This soft glow sets the scene for movie nights or casual hangouts with friends. Next, think about incorporating accent lighting on shelves to showcase your favorite decor pieces, adding a touch of personality and visual interest. For an added layer of comfort during viewing, consider backlighting your TV. This not only reduces eye strain but also enhances the overall viewing experience by providing a subtle glow around the screen.
Dimmable lights are a fantastic option to adjust brightness based on the time of day or activity, allowing you to create the perfect ambiance, whether you’re hosting a party or enjoying a quiet evening. Wall sconces on either side of the media wall add a touch of elegance and sophistication, elevating the design while providing additional illumination.
For those who love to play with mood, color-changing LED lights can be a game changer. Set the perfect tone for different occasions with just a tap on your smartphone. Track lighting can further enhance the drama, focusing on specific areas of the media wall, creating stunning visual effects. And speaking of convenience, smart lighting systems that can be controlled via mobile devices make managing your media wall lighting a breeze.
Finally, don’t forget about natural light. Position your media wall away from direct sunlight to avoid glare on the TV screen, ensuring an optimal viewing experience. Use lighting strategically to create focal points that draw the eye to unique design elements or features, making your media wall not just a functional space, but a striking centerpiece in your home.
5. Understanding Cost Factors for Media Walls
When planning your media wall, understanding the cost factors is essential to ensure your project stays within budget. First, consider the materials you choose. High-quality finishes, like natural wood or premium laminates, can significantly impact your budget, so weigh your options carefully. Next, if you plan to hire professionals for installation, labor costs will vary based on their expertise and your location, so factor in these expenses early on.
The complexity of your design also plays a crucial role. Intricate setups, featuring custom shelving or unique layouts, will require more time and resources, which translates to higher costs. Additionally, don’t forget to evaluate the costs of the electronics themselves, TVs, sound systems, and other devices can add up quickly and should be included in your overall budget.
If you’re considering built-in lighting or custom shelving, be aware that these features can enhance both functionality and aesthetics but will also increase your expenses. To find the best deals, look for local suppliers and compare prices on materials and components, which can help you stick to your budget without compromising on quality.
Another important aspect is future costs. Think about potential upgrades or changes to technology, as this might affect your long-term budgeting. Warranties and maintenance costs associated with electronics and furnishings should also be considered, as they can lead to unexpected expenses down the line.
Finally, if your media wall requires additional electrical outlets, be sure to factor in installation costs for that work. While it may seem like a significant investment upfront, a well-designed media wall can increase your property value, potentially offsetting your initial costs in the long run.
6. DIY vs. Professional Installation Choices
Choosing between DIY installation and hiring a professional can be a game-changer for your media wall project. If you’re handy and have the right tools, going the DIY route can save you money while allowing for a personalized touch. You can unleash your creativity and customize the design to fit your vision. However, keep in mind that a polished look requires skills and time, and your comfort level with tools will play a significant role in the outcome.
On the other hand, professional installers bring expertise and experience that can elevate your media wall design. They can ensure that everything fits seamlessly within the space and adheres to safety standards, especially when it comes to electrical wiring or technical installations. Plus, reputable professionals often provide warranties, giving you peace of mind about the quality of their work.
Before making a decision, assess the complexity of your design. If it involves intricate features or specialized skills, a professional might be the best choice. Additionally, consider the time commitment for a DIY project, as it may take longer than you anticipate. If you opt for DIY, tap into online resources and video tutorials for helpful tips. Ultimately, weighing these factors will help you choose the best path for your media wall.
7. Future-Proofing Your Media Wall Design
Future-proofing your media wall design is essential in a world where technology evolves rapidly. Start by choosing modular components that allow for easy upgrades as new devices hit the market. Incorporate ample power outlets and efficient cable management solutions to accommodate future electronics without creating clutter. Opt for a timeless design that avoids fleeting trends, ensuring your media wall remains stylish for years to come.
Consider the possibility of larger screens becoming the standard; design your wall with the flexibility to house them comfortably. Planning for additional tech, like smart home integrations, will help you adapt to advancements that enhance your living space.
Materials matter too. Select durable options that can be easily updated, such as paint or removable panels, so you can refresh the look without a complete overhaul. Adjustable shelving or compartments can be repurposed as your needs change, providing versatility for future storage solutions.
Incorporating smart technology is another smart move; make sure it can adapt to new devices and systems as they become available. Lastly, keep an eye on emerging technologies and design trends, allowing your media wall to stay relevant and functional for years to come.
8. Final Thoughts on Media Walls with Shelves
Creating a media wall with shelves is an exciting journey that can transform your living space into a stunning focal point. With proper planning, you can design a cohesive and functional layout that showcases your personal style while enhancing the room’s usability. Flexibility in design is vital, allowing your media wall to adapt as your needs evolve. Consider the balance between aesthetics and functionality: a well-designed media wall not only looks great but also serves practical purposes, like reducing clutter and providing storage solutions. Adding personal touches through decor makes the space uniquely yours, making it a true reflection of your lifestyle. As you embark on this project, evaluate your daily activities and choose features that support how you use the space. Remember, a successful media wall enhances both the beauty and value of your home, and the process of creating it should be enjoyable, allowing your personality to shine through.