
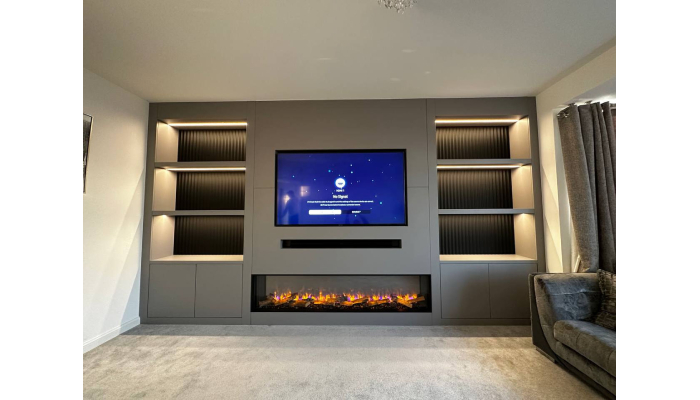
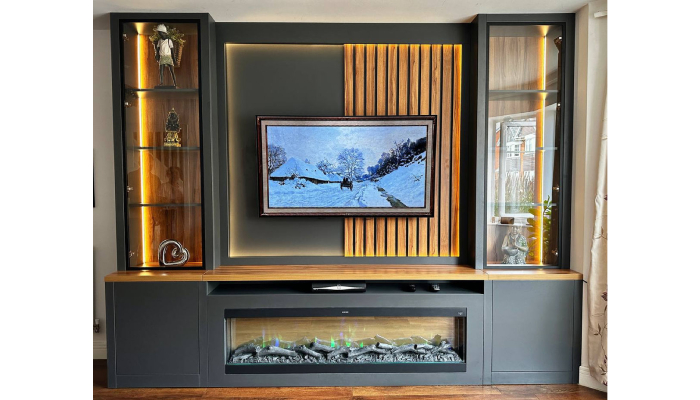
Installing a modern media wall can significantly elevate your living space’s style and function. This exciting project not only organizes entertainment equipment but can also showcase features such as electric fireplaces, creating a cozy atmosphere. To start, consider the location of your wall and make a layout design that includes your TV, fireplace, and shelving. Gather all the necessary materials like timber or metal studs as well as tools such as a power drill and level. Step-by-step, you’ll construct the frame, manage electrical wiring neatly, install both the fireplace and TV securely, then finish with beautiful decorations. Following this guide makes DIY installation much easier.
Planning Your Media Wall Project
Before diving into your modern media wall project, take a moment to define its primary function. Will it serve as a display for your TV and decor, a storage solution for devices and accessories, or both? This clarity will guide your design choices. Next, explore styles and materials that resonate with your home decor. Whether you lean toward a sleek modern look or a cozy rustic vibe, the right choices can elevate your space. Think about the room’s flow too; ensure the media wall complements your existing furniture and enhances the overall aesthetic.
Cable management is another crucial aspect to consider. Nobody wants a tangle of wires ruining the visual appeal of their stylish setup. Plan for discreet cable pathways to keep everything tidy. Lighting can also play a significant role in showcasing your media wall. Built-in LEDs or accent lights can create a stunning focal point, giving the space a warm ambiance.
Multimedia integration is essential, especially if you have a sound system or gaming consoles to incorporate. Make sure your design allows for easy access and connections to all devices. Establishing a budget is vital too; it helps define the scope of your project and keeps your spending in check.
Gathering inspiration from platforms like Pinterest or home improvement blogs can spark creativity and help visualize your ideas. If you feel uncertain about structural changes or electrical work, don’t hesitate to consult with professionals. They can offer valuable insights and ensure safety. Lastly, set a timeline for your project to stay organized and motivated, making the process enjoyable.
- Identify the primary function of the media wall, such as storage, display, or both.
- Research different styles and materials to find what fits your home decor.
- Consider the flow of the room, ensuring the media wall complements the existing furniture.
- Think about cable management options to keep the area tidy and uncluttered.
- Plan for lighting, such as built-in LEDs or accent lights, to highlight your media wall.
- Explore multimedia integration options for sound systems or gaming consoles.
- Establish a budget to determine the scope of your project.
- Gather inspiration from online sources, such as Pinterest or home improvement blogs.
- Consult with professionals if you’re unsure about structural changes or electrical work.
- Set a timeline for your project to keep yourself organized and motivated.
Gathering Materials and Tools
Before diving into your exciting media wall project, it’s crucial to gather all the materials and tools you’ll need. Start by making a complete list based on your design and measurements. This ensures you won’t have to make multiple trips to the store. Head to local hardware or home improvement stores for quality supplies, and don’t hesitate to check online retailers for specific items that may not be available nearby.
As you gather your tools, ensure they are in good working condition, especially power tools like drills and saws. Safety should be a top priority, so gather essential safety gear such as goggles and gloves to protect yourself during the build. Double-check that you have all necessary electrical components, including outlets and switches, to keep everything functional.
If you plan to include a fireplace in your design, make sure you have the necessary venting materials or accessories to ensure safety and efficiency. For more complex builds, consider getting additional tools like clamps or a stud finder. If you come across tools that you may only use once, renting them can save you money.
Finally, organize your workspace to create a smooth building process. A tidy area will help you stay focused and efficient as you construct your stunning media wall!
Building the Media Wall Frame
Start by determining the exact dimensions for your frame based on your design. This is crucial, as a well-measured frame will ensure everything fits perfectly. Cut your timber or metal studs to size, making sure you do this with precision. Each cut needs to be straight to provide a sturdy structure. Once you have your studs, use a level to check that every stud is perpendicular to the floor. This prevents a crooked frame, which can lead to an unbalanced media wall. Secure the frame to the wall with appropriate fasteners, considering the type of wall you are working with, whether it’s drywall, masonry, or another material. As you build the frame, create openings for wiring and outlets; this proactive step will save you from making adjustments later on. The frame must be strong enough to support the TV and other components without sagging, so don’t skimp on the materials. Add horizontal support beams where needed for extra stability, especially if you plan to mount heavy equipment. If your wall is in a colder area, consider adding insulation to maintain room temperature. Always check your measurements multiple times before cutting to avoid waste, as mistakes can be costly. Finally, finish the frame with any necessary protective coatings to prevent damage, ensuring your media wall remains stunning for years to come.
Installing Electrical Components
Start by planning the layout of your electrical outlets for maximum convenience. Think about where your TV, sound system, and other devices will sit, and ensure the outlets are at a height that is easy to reach yet discreet. Running electrical wiring inside the wall gives your media wall a clean and polished look. Always check that your electrical system meets local codes for safety. After installation, use a circuit tester to verify that all outlets are functioning as they should. Labeling your wires clearly can save you time and confusion later when connecting various devices. For added protection, consider installing a surge protector to safeguard your electronics from unexpected power surges. If you want to keep the focus on your media wall, place outlets in hidden areas whenever possible. Also, think about integrating smart home technology for a touch of modern convenience.
Setting Up the Electric Fireplace
Choosing the right electric fireplace is crucial for your media wall. Start by selecting a model that fits perfectly within your designated space, ensuring it complements the overall design. Always follow the manufacturer’s installation instructions closely to avoid any mishaps. Make sure to leave enough clearance around the fireplace to prevent overheating, as safety should always come first. Connect the fireplace to a dedicated electrical outlet to ensure safe operation, and before securing it in place, test it to confirm everything is working smoothly.
If you’re considering a wall-mounted fireplace, it’s essential to anchor it securely to the frame to avoid any accidents. For added convenience, think about including a remote control, making it easy to operate without getting up. Once installed, check for any maintenance requirements and adhere to the guidelines to keep your fireplace in excellent condition.
When decorating around the fireplace, opt for non-flammable materials to maintain safety while enhancing the aesthetic appeal of your space. You might also want to think about incorporating a mantel or other decorative features to elevate the look even further. These thoughtful touches can turn your electric fireplace into a stunning centerpiece, making your modern media wall truly shine.
Mounting Your TV
Mounting your TV is a pivotal step in creating a sleek media wall. Start by selecting a mounting bracket that aligns perfectly with your TV’s size and weight. This ensures not only safety but also stability. Next, locate the wall studs using a stud finder. Finding the right spots to anchor your bracket will provide a secure hold, preventing any unfortunate accidents down the line. Once you’ve located the studs, carefully follow the manufacturer’s instructions to mount the bracket accurately. It’s essential to center the TV on the wall and position it at eye level for the best viewing experience. If you want more versatility, consider using a tilting or swivel mount, allowing you to adjust the angle for different seating arrangements. Before you hang the TV, double-check all connections and screws, this step is crucial for peace of mind. After mounting, use cable management systems to hide those pesky wires, creating a clean and organized look. Once everything is set, test the TV’s functionality. Make sure the remote control works smoothly without any obstructions. Finally, handle the TV with care during installation to avoid any accidental damage. With these steps, you’ll have your TV mounted securely and stylishly, ready for viewing!
Finishing Touches and Decoration
To truly elevate your modern media wall, focus on the finishing touches and decoration that can transform it into a stunning focal point in your room. Start by selecting a finish that complements your overall room decor, whether that’s a fresh coat of paint or stylish wallpaper. Don’t overlook the potential of adding shelves or cabinets; they not only provide additional storage but also offer great display options for your favorite books or decorative items.
Personalization is key, so think about incorporating elements that reflect your style, like vibrant plants, eye-catching art, or cherished memorabilia. For a modern touch, LED strip lights can add a beautiful ambiance, enhancing the overall atmosphere of your space. After finishing the frame, ensure all surfaces are smooth and free of imperfections to create a polished look.
Consider integrating a soundbar or speakers into your design for an enhanced audio experience, making movie nights even more enjoyable. Using matching materials for shelves and supports will create a cohesive look that ties everything together beautifully. As you step back to view your work, check the overall balance of the design; make adjustments to ensure that it feels harmonious and inviting. Finally, think about how to integrate personal items seamlessly, ensuring they are accessible while avoiding clutter. Keep functionality in mind as you decorate, allowing for easy access to wires and devices, so your media wall remains as practical as it is stylish.
Testing and Styling Your Media Wall
Now that your media wall is installed, it’s time to put it to the test and give it some personality! Begin by turning on all components, including your TV and fireplace, to confirm everything is functioning properly. Adjust your TV settings to achieve the best picture quality and sound, ensuring an optimal viewing experience. If you’ve integrated smart devices, double-check that they are connected to your home network for seamless operation.
Next, test the remote control to ensure all functions are working smoothly. Once you’ve confirmed that everything is operational, step back and evaluate the overall aesthetic. Consider how the media wall appears from different angles in the room, and make adjustments to achieve a sense of balance and cohesion.
Gather feedback from family or friends, sometimes a fresh pair of eyes can spot improvements you might have missed. Take your time arranging decorative items to enhance visual appeal and organization. It’s essential to ensure that all cables are neatly tucked away or concealed, adding to the clean look of your media wall.
Finally, take a moment to celebrate your hard work! Enjoy your newly styled living space, and relish the comfort and functionality that your modern media wall brings.
Tips for a Successful Installation
Start your installation journey with a handy checklist, ensuring that each step is completed thoroughly. Staying organized throughout the project will save you time and help you avoid mistakes. Remember, this is not a race; take your time to ensure quality work and a beautiful finish. If you find yourself struggling with heavy items or tricky installations, don’t hesitate to ask for help. Teamwork can make the job easier and more enjoyable. Also, don’t forget to take breaks to avoid fatigue, keeping your mind sharp is crucial for a successful installation.
As you go, document your progress with photos. Not only will this capture your DIY journey, but it can also serve as a reference for future projects. While planning your media wall, consider potential upgrades. This foresight can prevent the need for rework later on. Be prepared for unexpected challenges, and have a flexible approach in your design to adapt as needed. Lastly, enhance your skills by researching and watching tutorial videos; this preparation can make a real difference in your confidence and execution.